The perception module of an autonomy system is responsible for taking sensor inputs and reasoning about where objects are in space, and where the ego vehicle or robot is relative to those objects. Many autonomy systems use cameras as a primary sensor for perception stacks, as they provide rich RGB information about the world. Deep learning models are trained using comprehensive image datasets to make inferences from camera data while the robot is operating in its environment.
Object detection
An object detection system is responsible for detecting:
- Presence of an object of interest in the scene
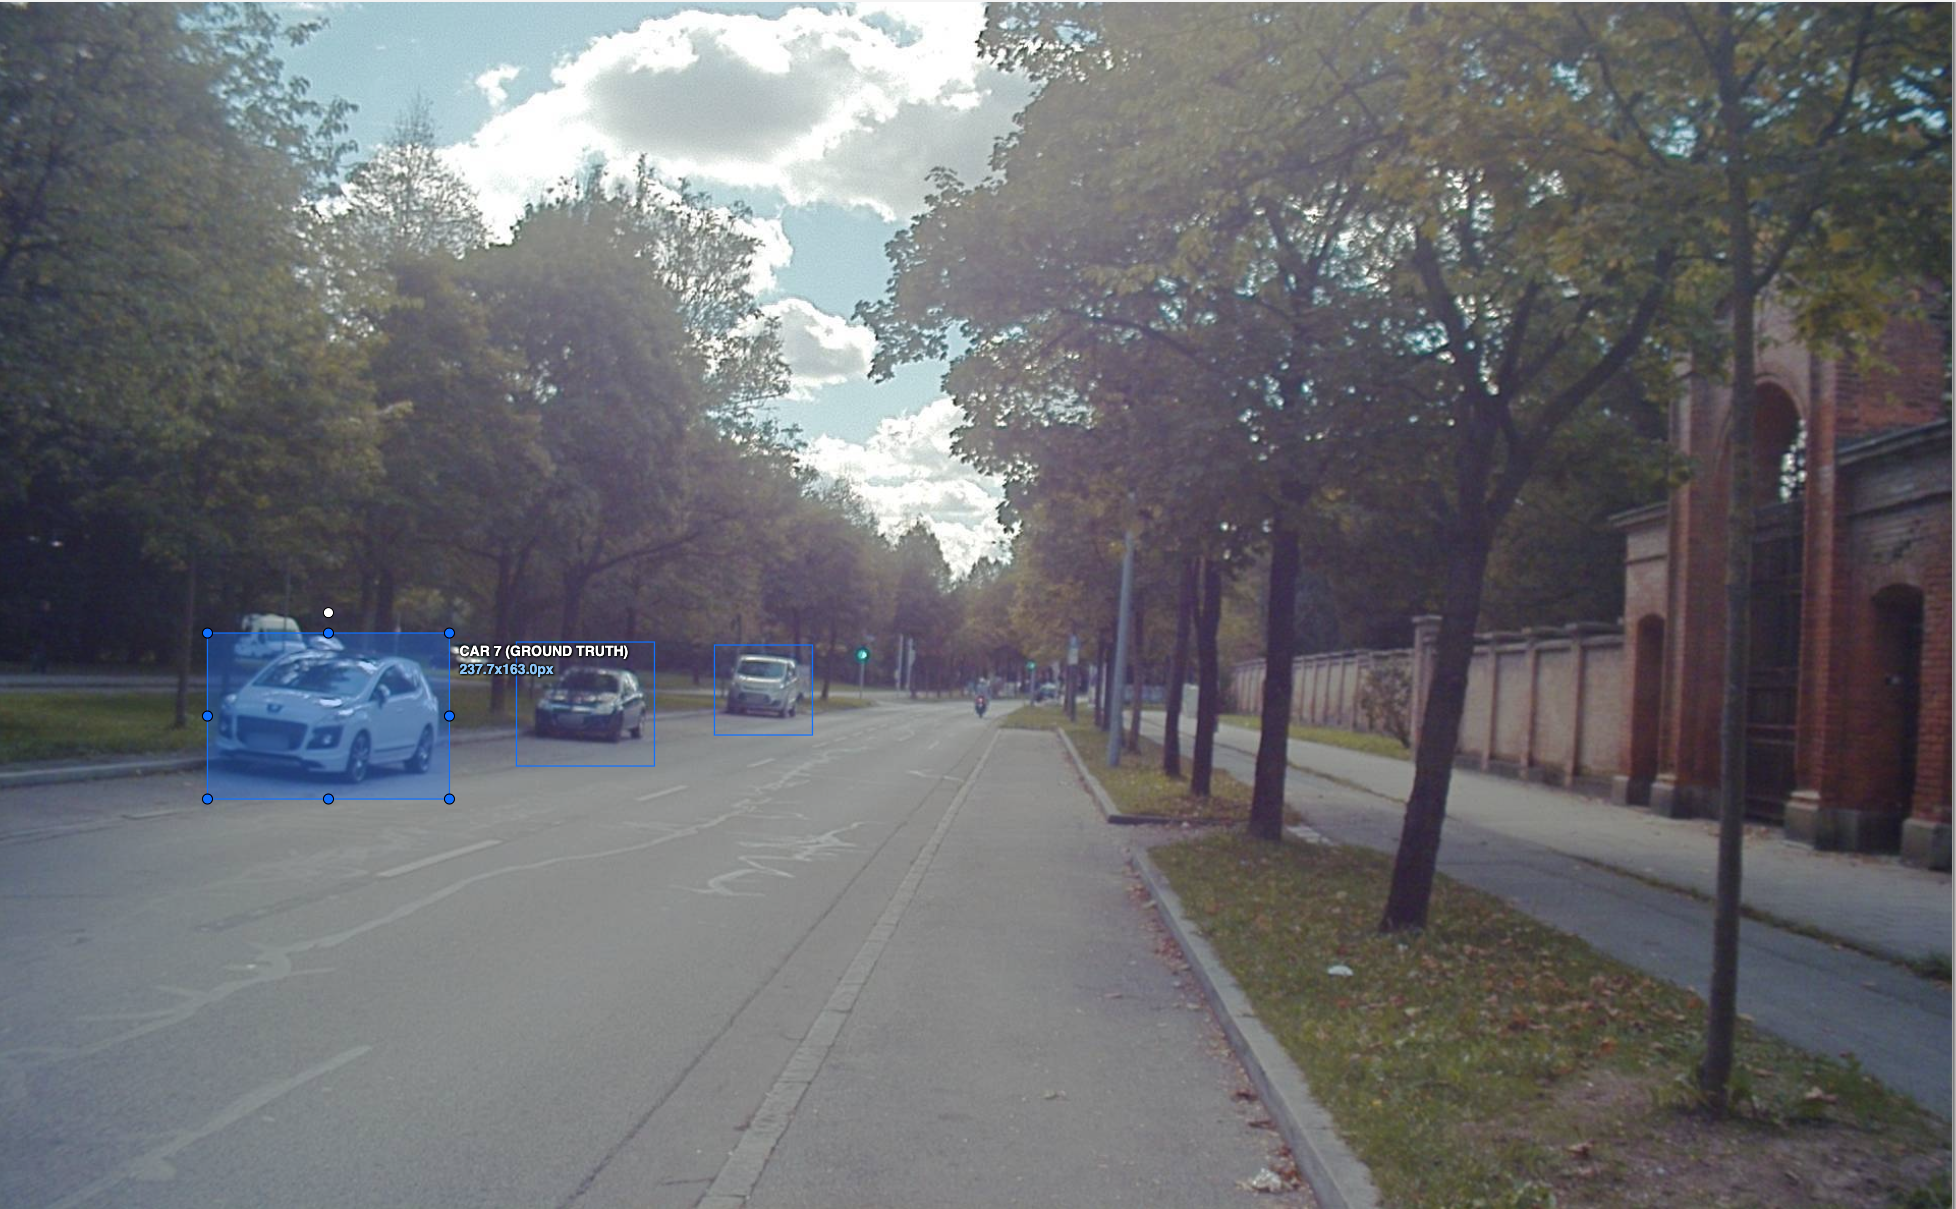
- Location of the object in the image with the help of bounding boxes (see image below)
Training these AI models requires following a comprehensive pipeline: curating specialized datasets, training models, and evaluating the trained models with test datasets. Additionally, in real-world applications, the robot may encounter new situations, in which case new cases (images) are rapidly added to both the training and testing datasets.
ReSim for evaluating perceptions systems
Evaluation of these datasets requires repeated metric calculations and the curation and analysis of visualizations across different model versions. ReSim is a cloud-based simulation testing and analysis platform, built specifically for robotic applications. It is a natural fit for evaluating perception systems like object detection, as it is purpose-built for simulating, testing, and analyzing robotic behavior at scale.
ReSim provides scalable cloud testing infrastructure, allowing developers to test thousands of images with the click of a button and visualize results using curated metrics and visualizations. It supports easy addition of test cases and visualizations, and includes tools for parameter tuning and version comparison. This blog post demonstrates how to evaluate object detection using the ReSim platform.
Step 0 - Dataset curation
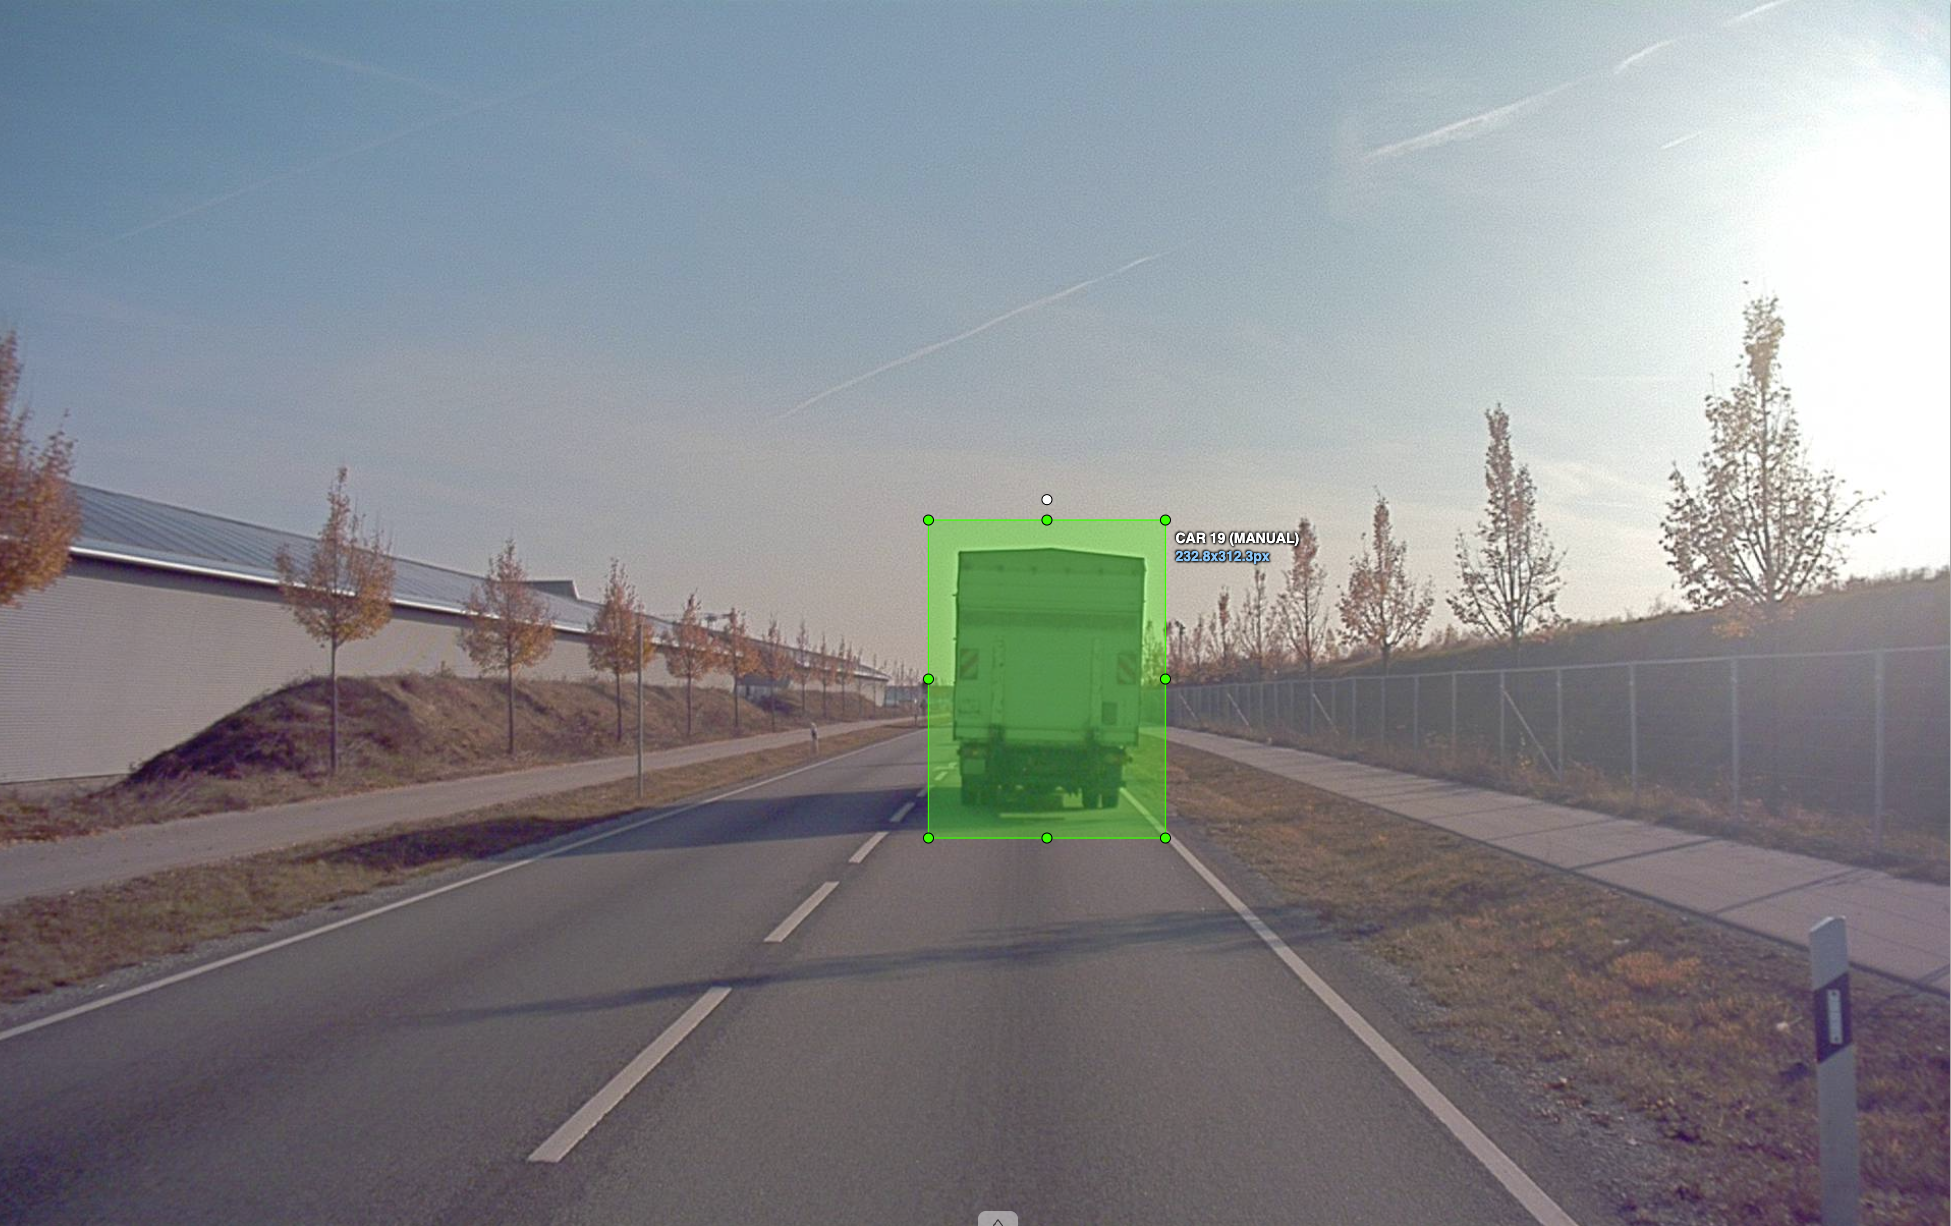
We will use a subset of the Audi A2D2 Autonomous Driving dataset,. A sample of 10 images for local testing will be provided in the sandbox repository. This dataset contains various scenes such as urban driving (as shown above), highway driving while following a truck, among others.
The ground truth annotations include the following:
- What objects are in the scene (class label)
- Bounding box rectangles in pixel coordinates showing their location
The ground truth annotations and images are added to S3 with the required access and become the inputs to the Experience stage.
Step 1 - Experience build
The experience stage is running the model on the input images. The code for this will be found in the sandbox/systems/perception/experience folder. We will be running the OWL VIT model which is a general purpose model that can take queries of objects (in this case cars and trucks) and detect those objects in images. The code for running the model and detecting objects is dockerized and forms the experience build. This is uploaded to an ECR and given the necessary access, so that ReSim can extract and run in the cloud.
Step 2 - Metrics build
This is the code for evaluation of models. In our case, we will look at simple evaluation metrics:
- number of False Positives
- number of False Negatives
- Precision Recall Curve
The actual list of metrics required to evaluate these models is much higher than the list above. The purpose is only to show the use case. The code for calculating these metrics can be found in the sandbox/systems/perception/metrics folder in the sandbox repository. This code is similarly dockerized and pushed to an ECR and forms the metrics-build.
Step 3 - Registering with ReSim
The substep before running includes using the ReSim CLI to register the experience files in S3, the experience build and metrics build in ECR to ReSim. Check the Getting Started Docs for more info.
Once this is done, you can optionally create Test Suites (groupings of experiences and a metrics build). After this step, you are ready to run your tests on the cloud.
Step 4 - Running the test
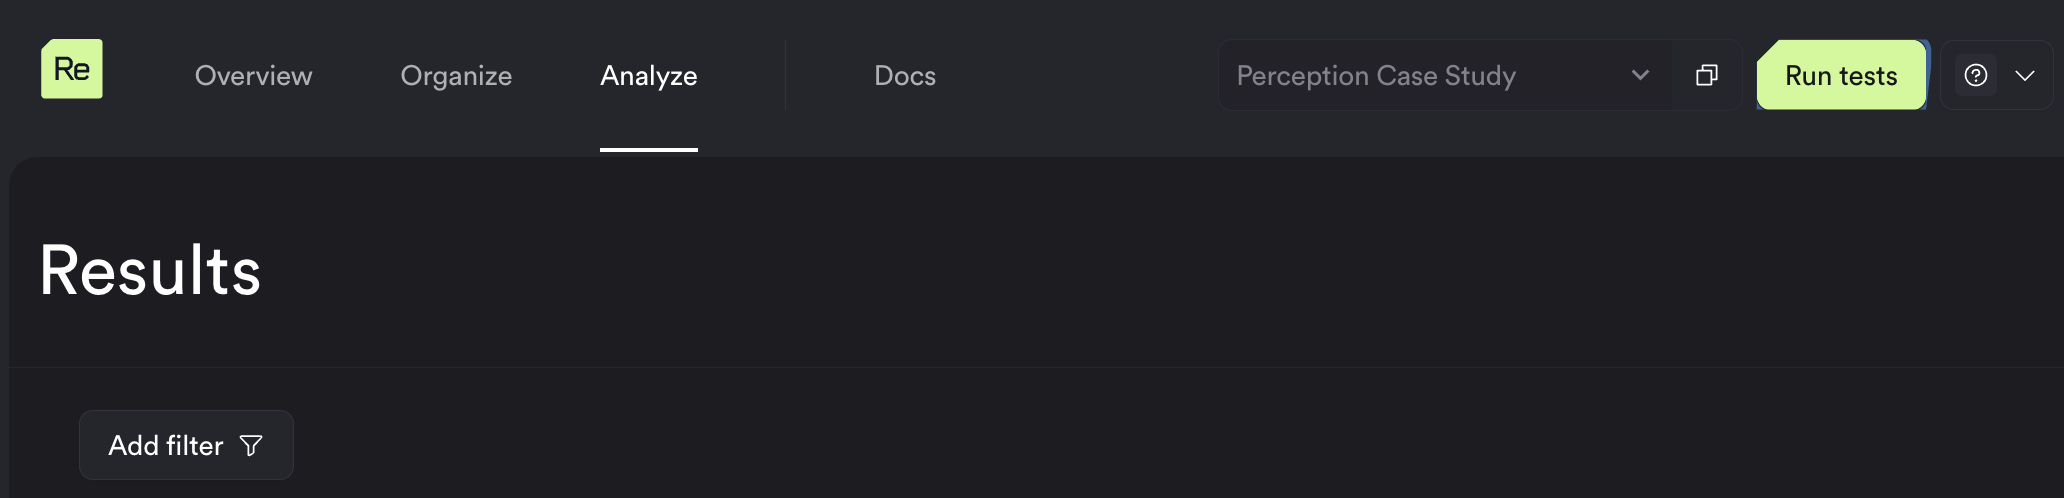
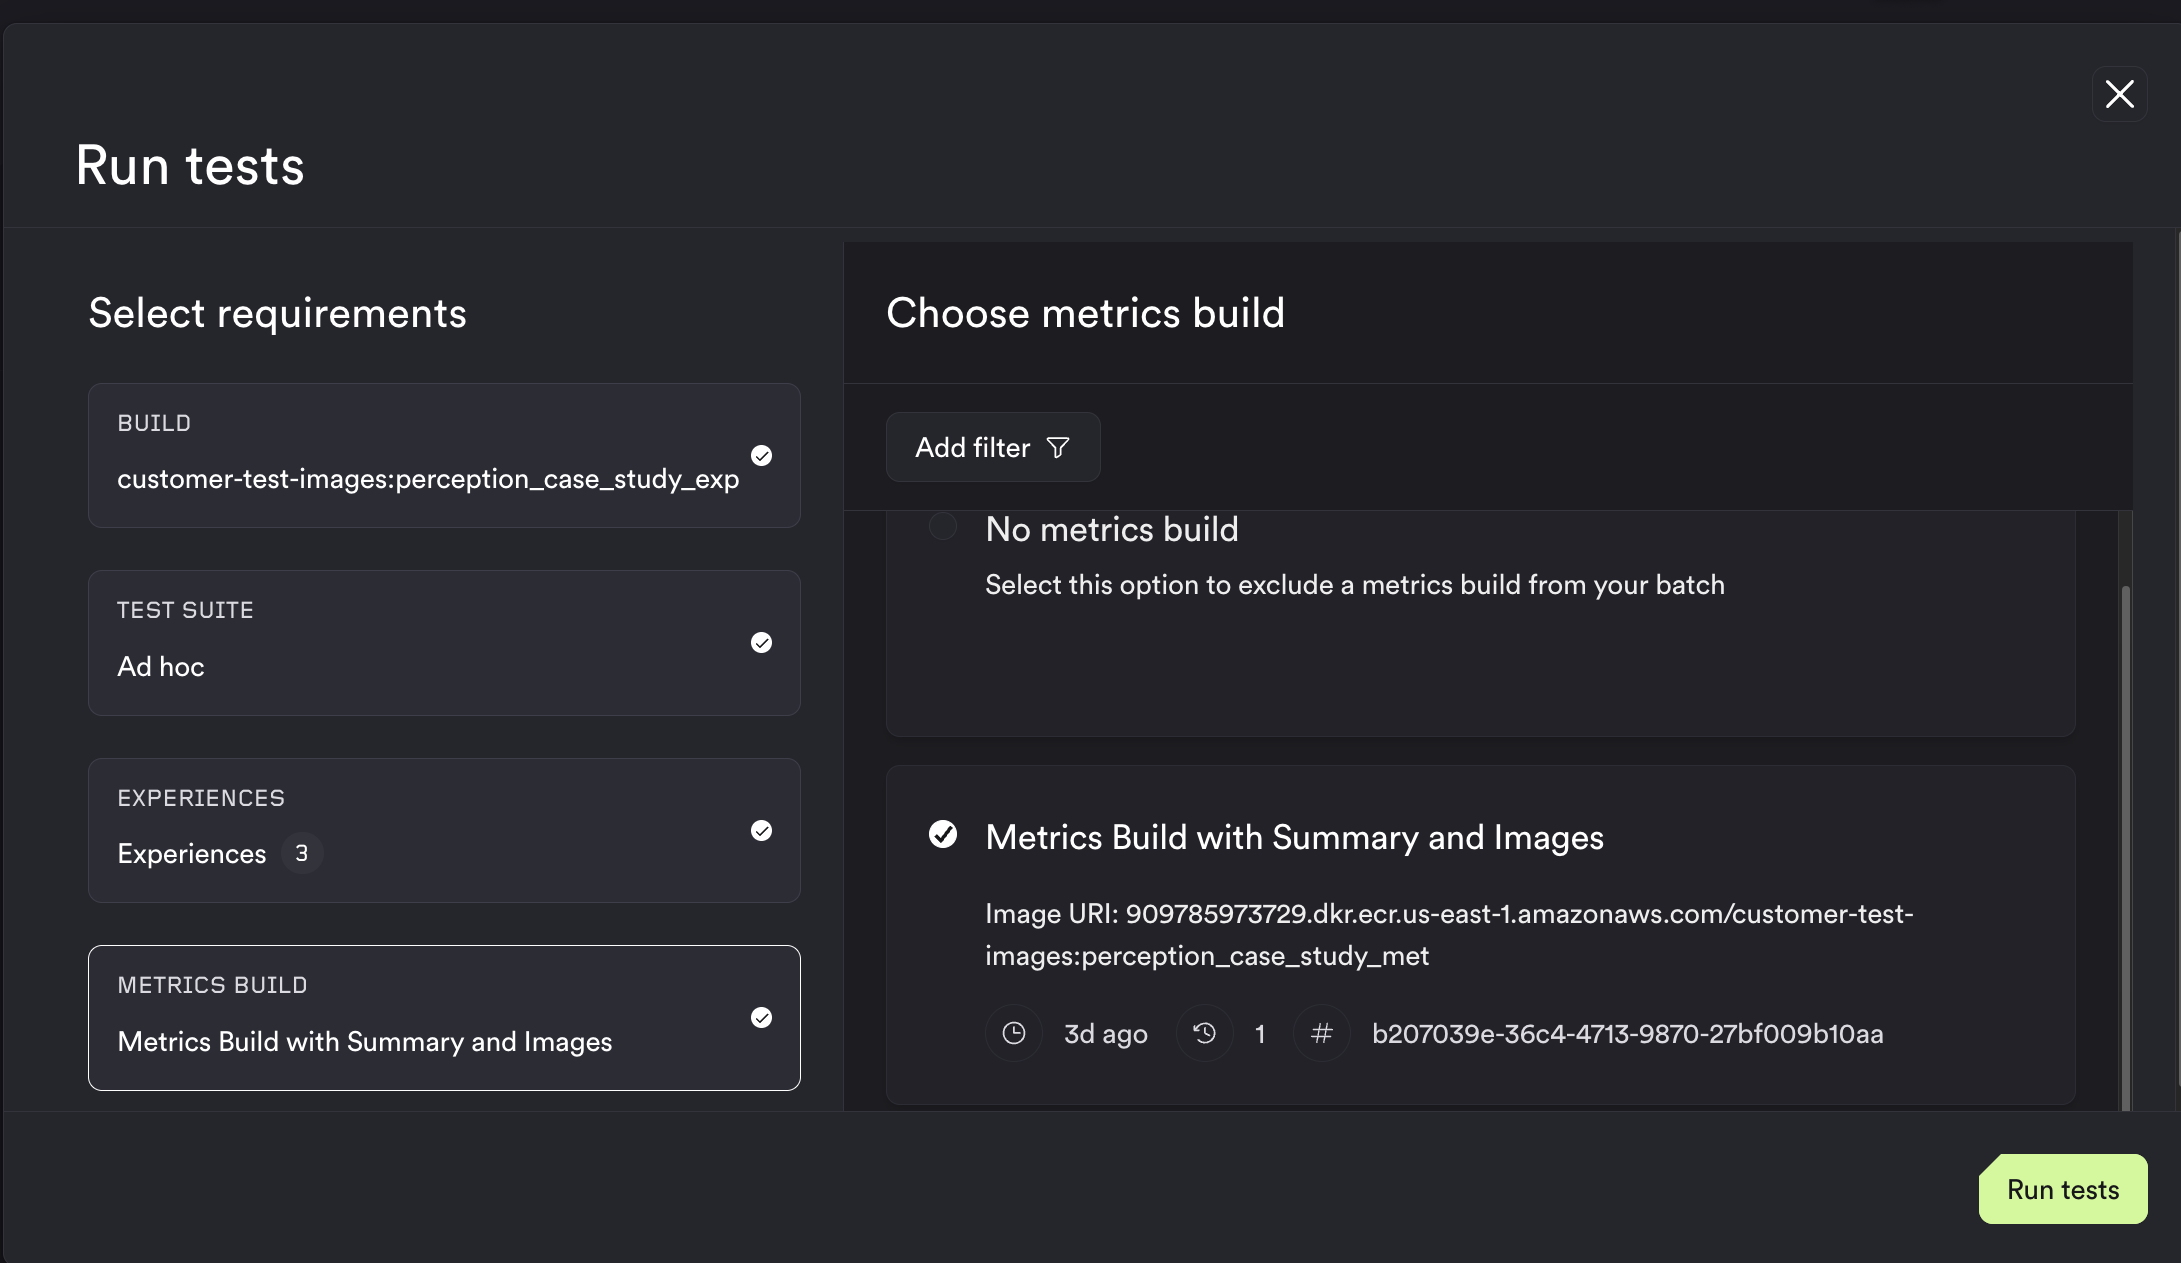
The steps moving forward are, fortunately, very simple. All you need to do to run the test is, go to ReSim Web App, navigate to your project on the top right, and hit Run Tests.
This opens a popup as shown below. Select the experience build, test suite (or) experiences (in this case sequences) and the metrics evaluation build to run, hit Run Tests and step back and wait, while the model evaluation and analysis is run on the cloud.
Step 5 - Checking results
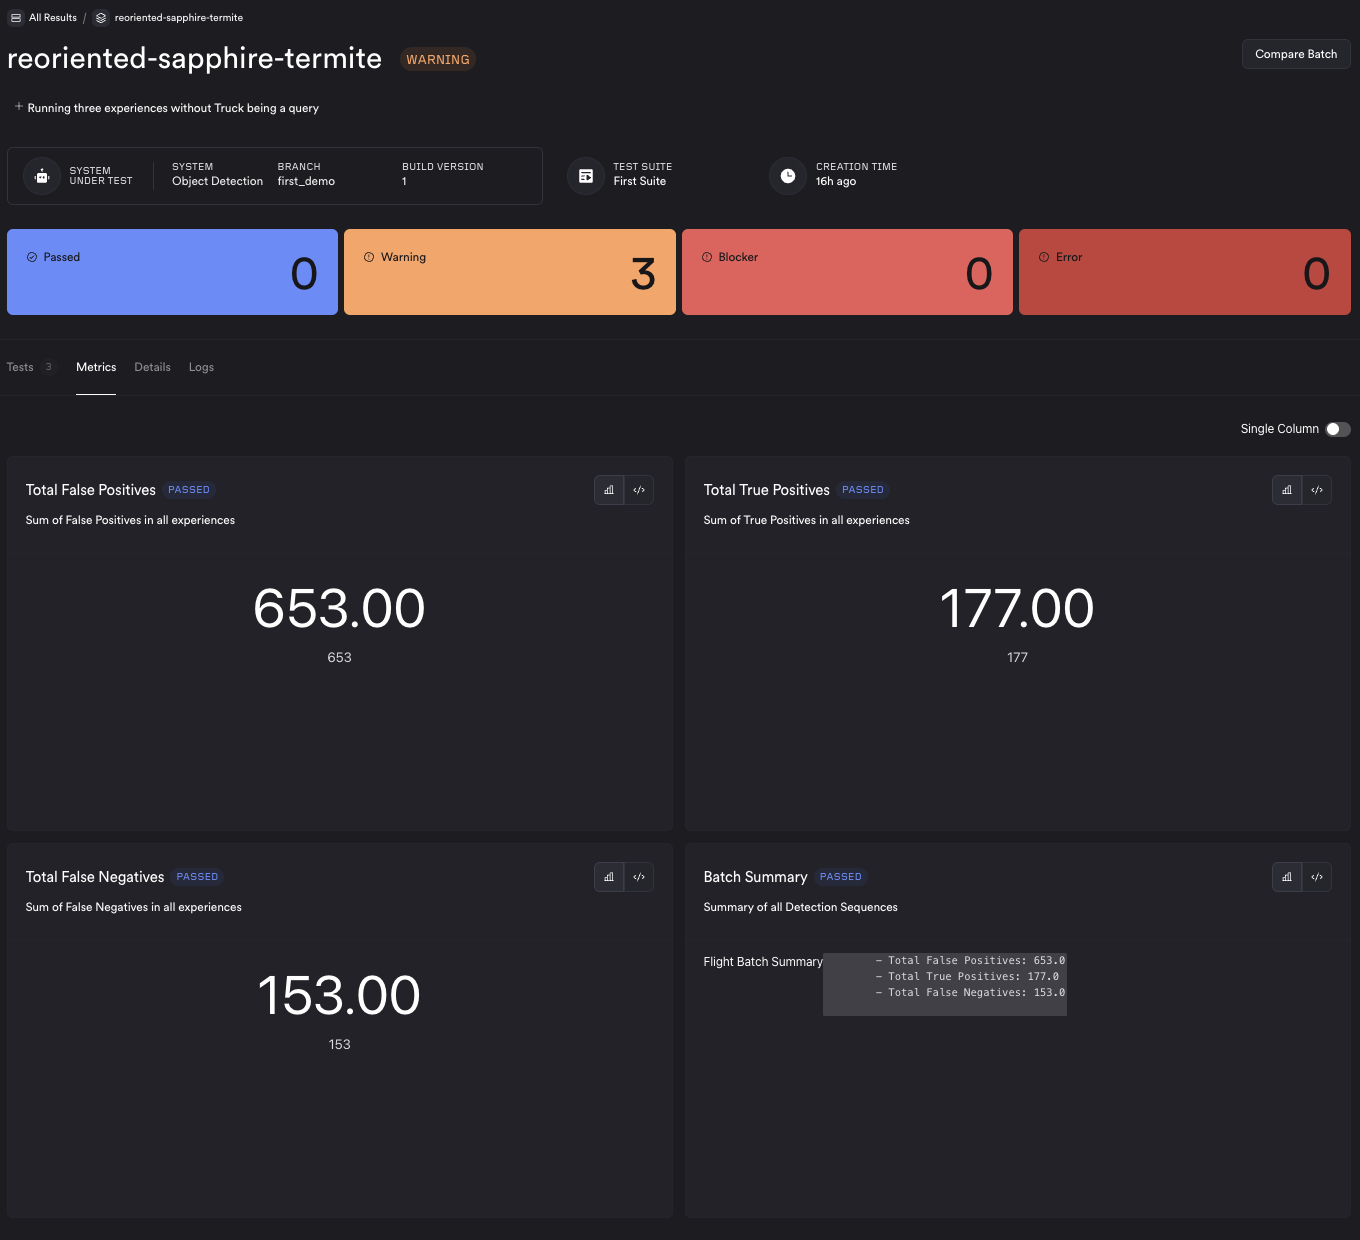
Once the results are ready, you can see the batch results page, which contains a summary of all the tests that ran, and categorizes them based on passing criteria. In our case, we ran 3 tests run, and all had warnings because of the presence of False Positives and False Negatives. The metrics you see on the batch run (reoriented-sapphire-termite is the name of the specific batch), are aggregated across tests, and these metrics are called Batch Metrics. In this case, they are Total False Positives and, Total False Negatives across all tests.
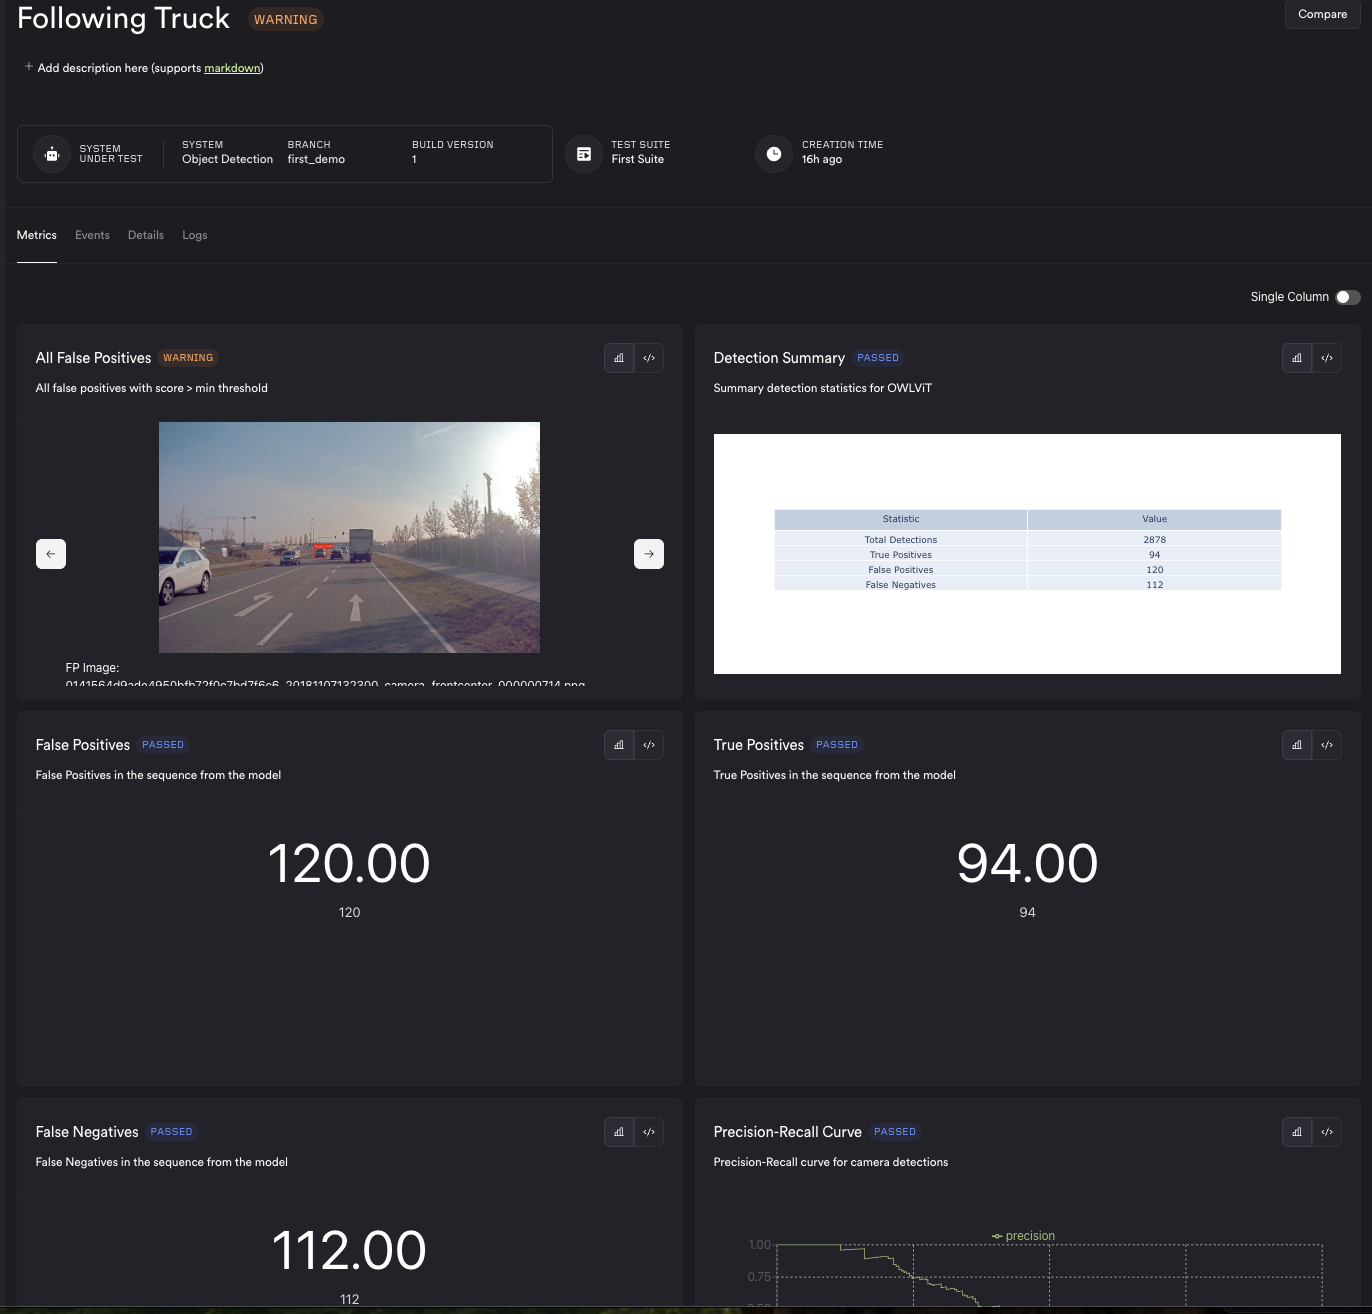
Click on the tests tab on the batch, to look at results from separate tests. One of the tests in this batch is called Following Truck, which contains images from a sequence of the ego vehicle following a truck on a highway. You would be able to see metrics from the results of the model running the input camera images. In this case, we added a list of images which are False Positives, the Precision Recall Curve, and other metrics.
Events
An event is another mechanism for visualizing specific data. In our case, we have two types of events :
- False Negatives
- False Positives
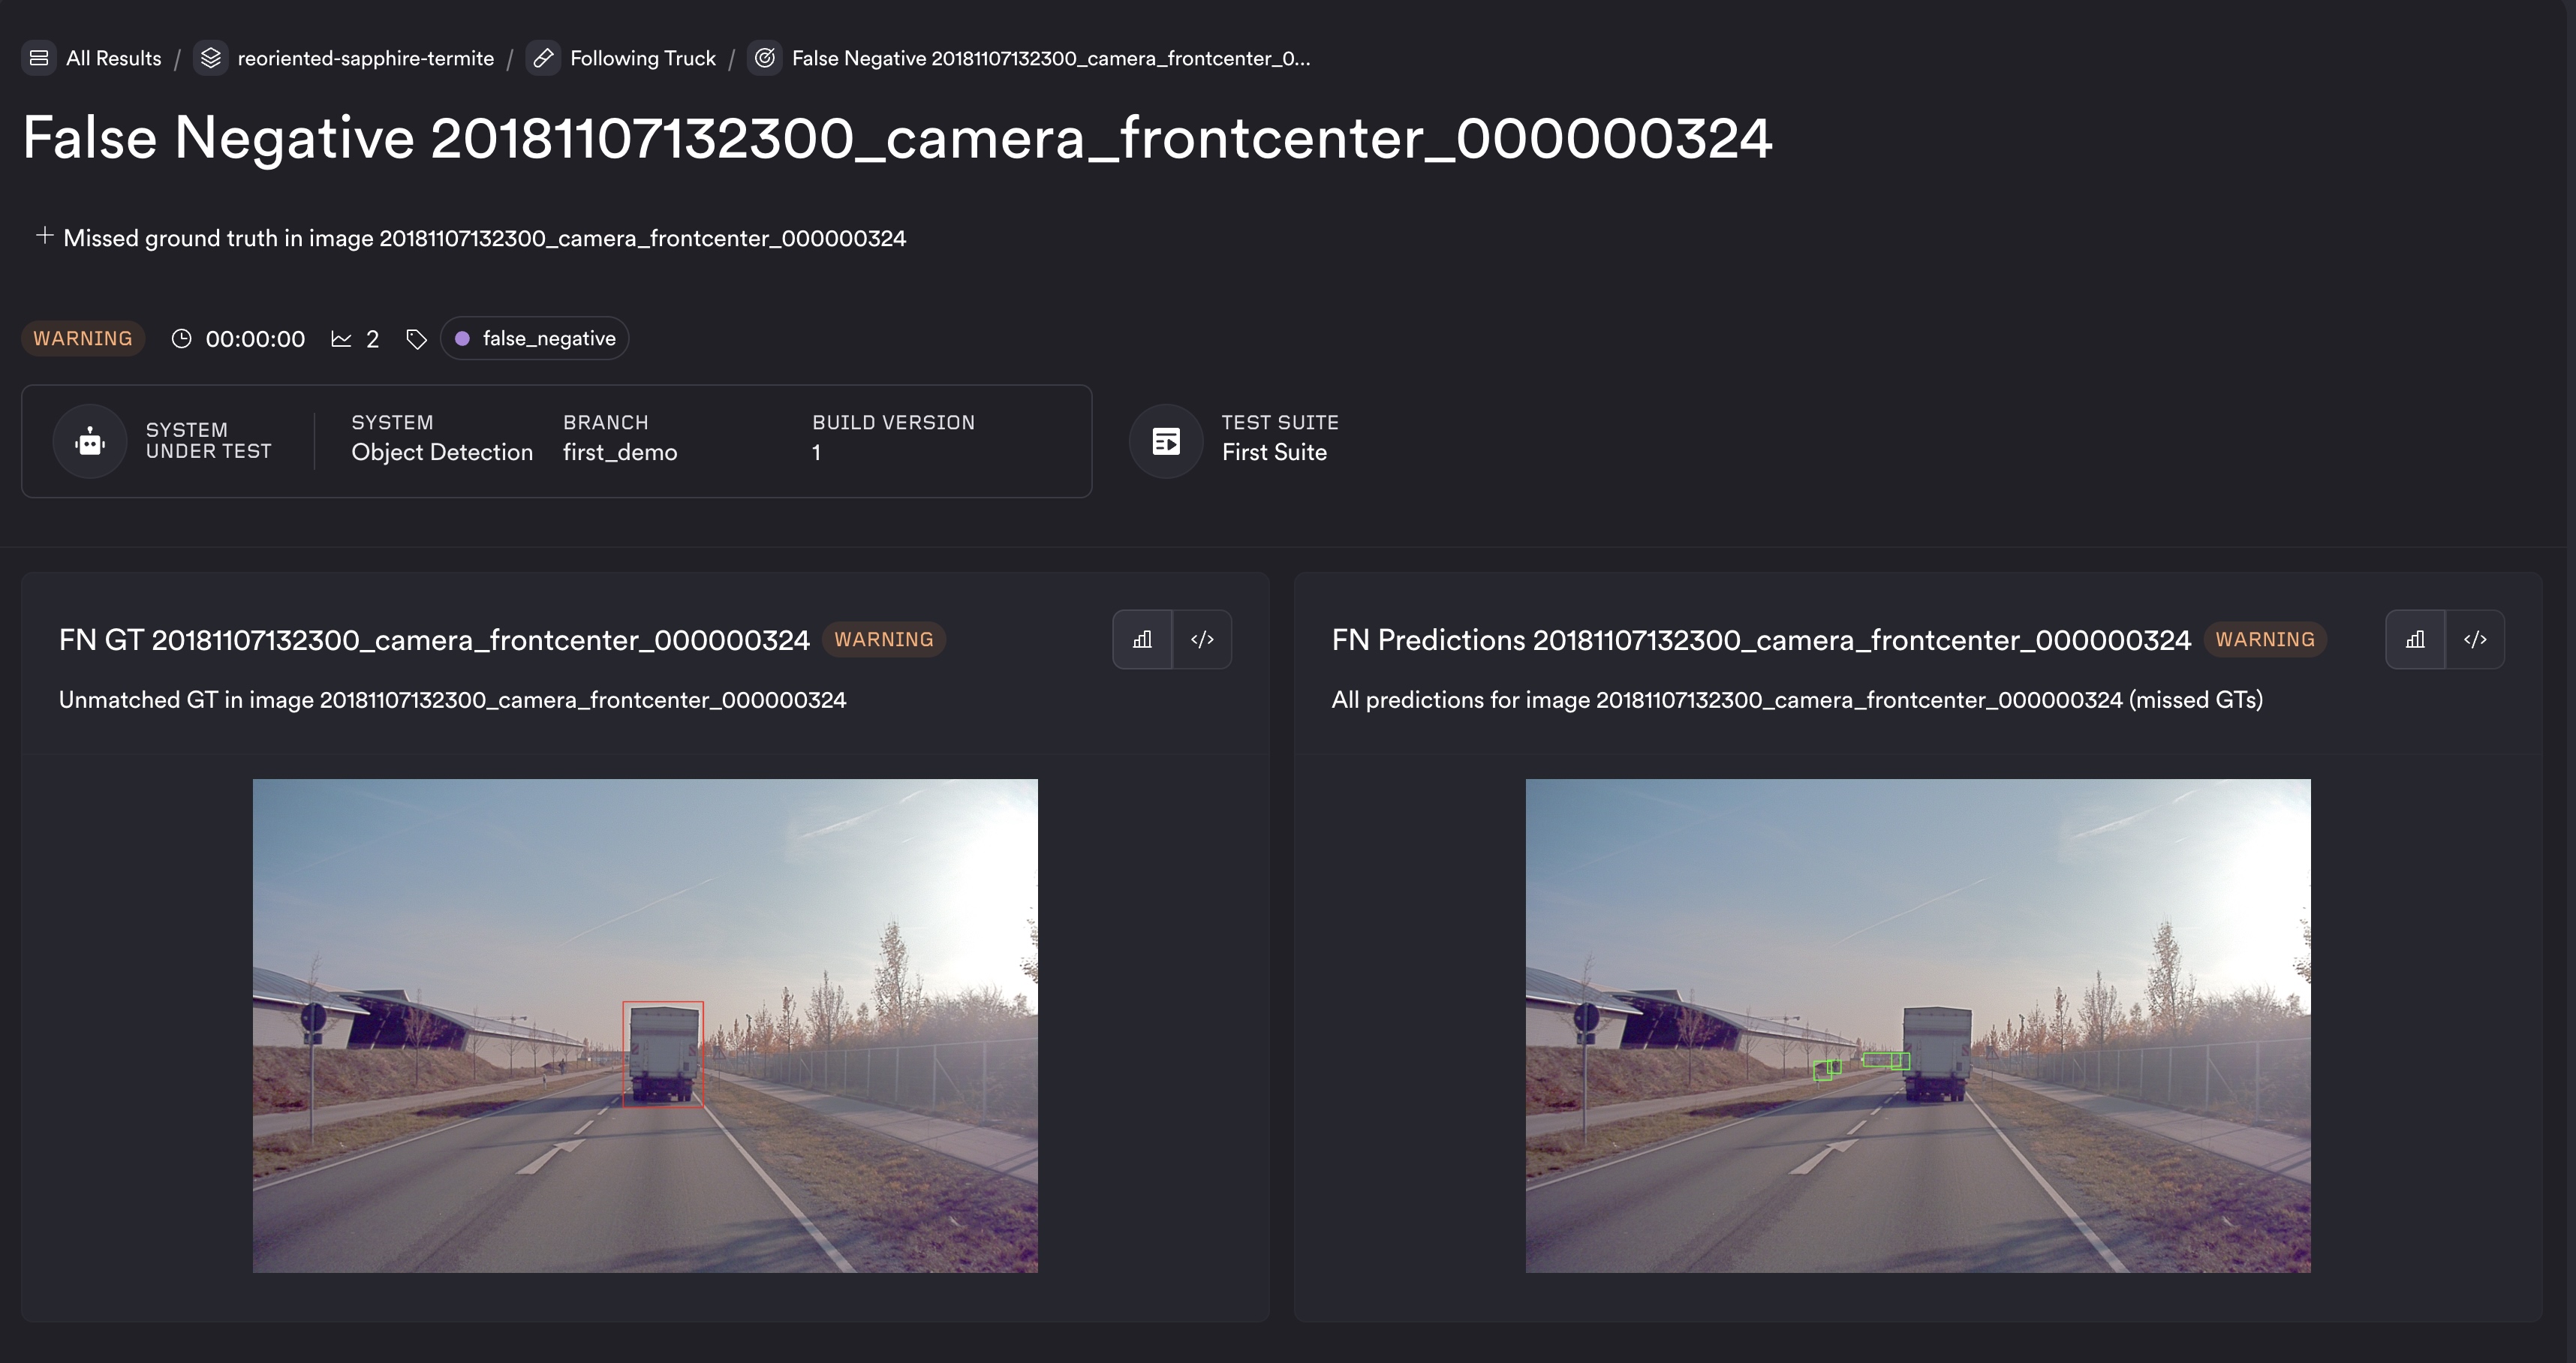
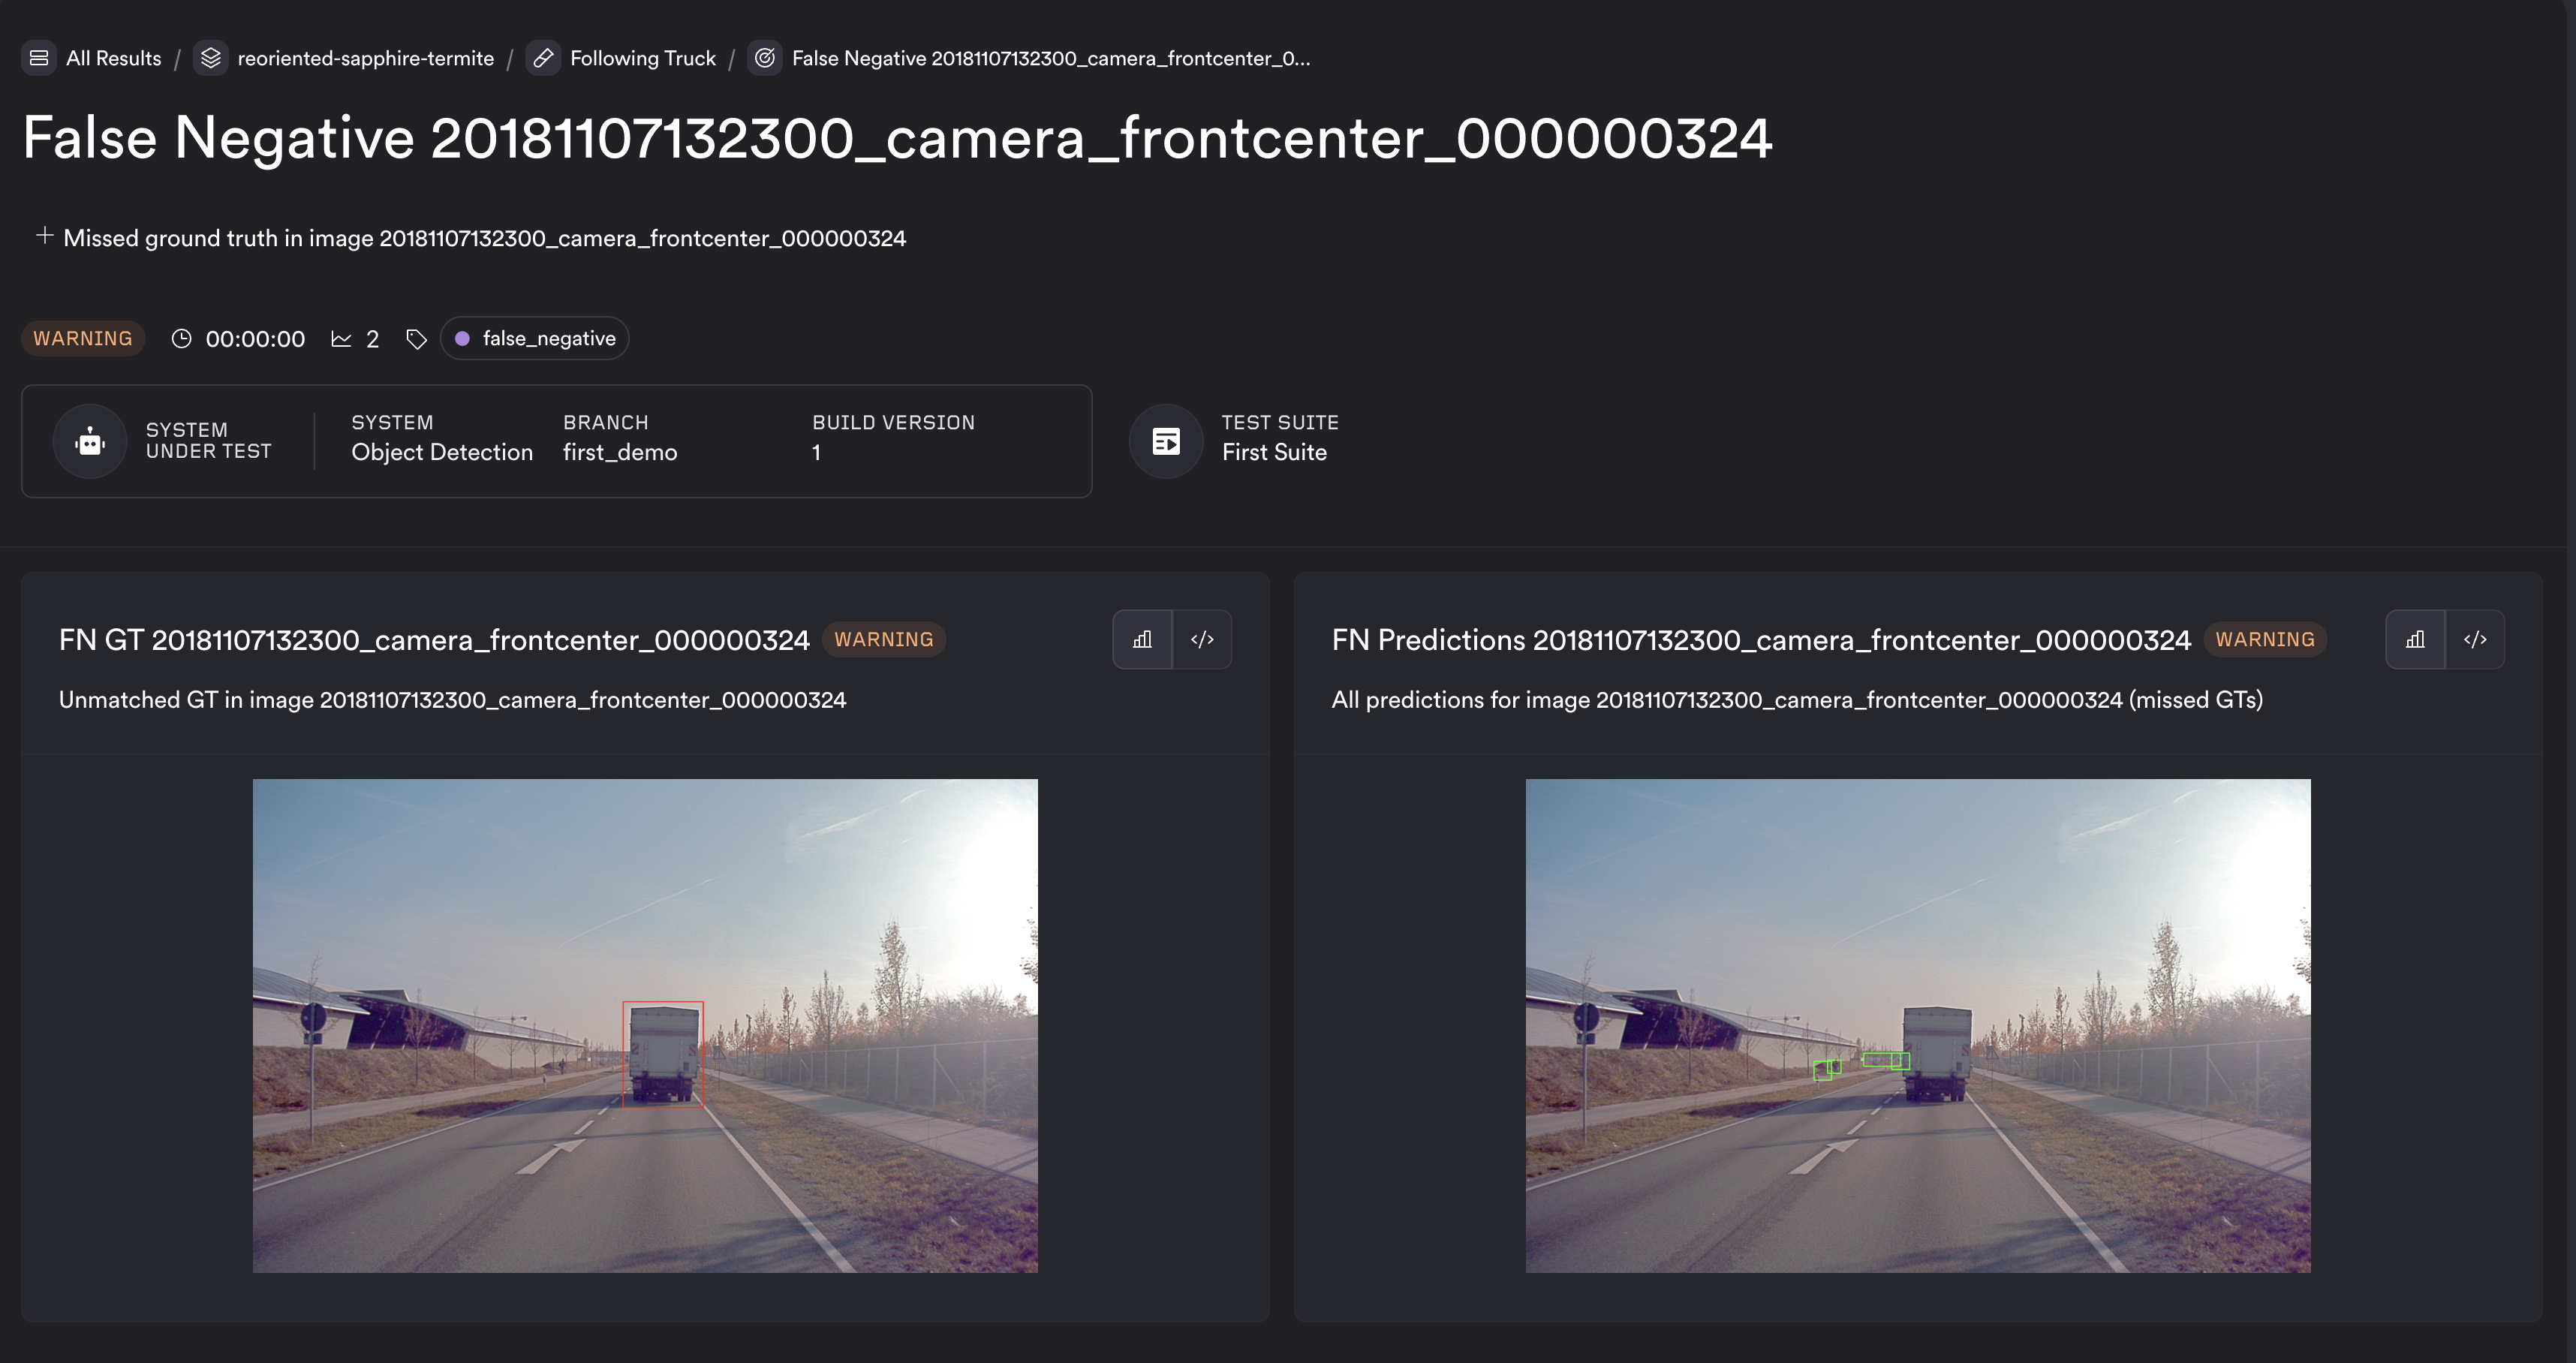
Filtering for only False Negatives, we get a screen like below:
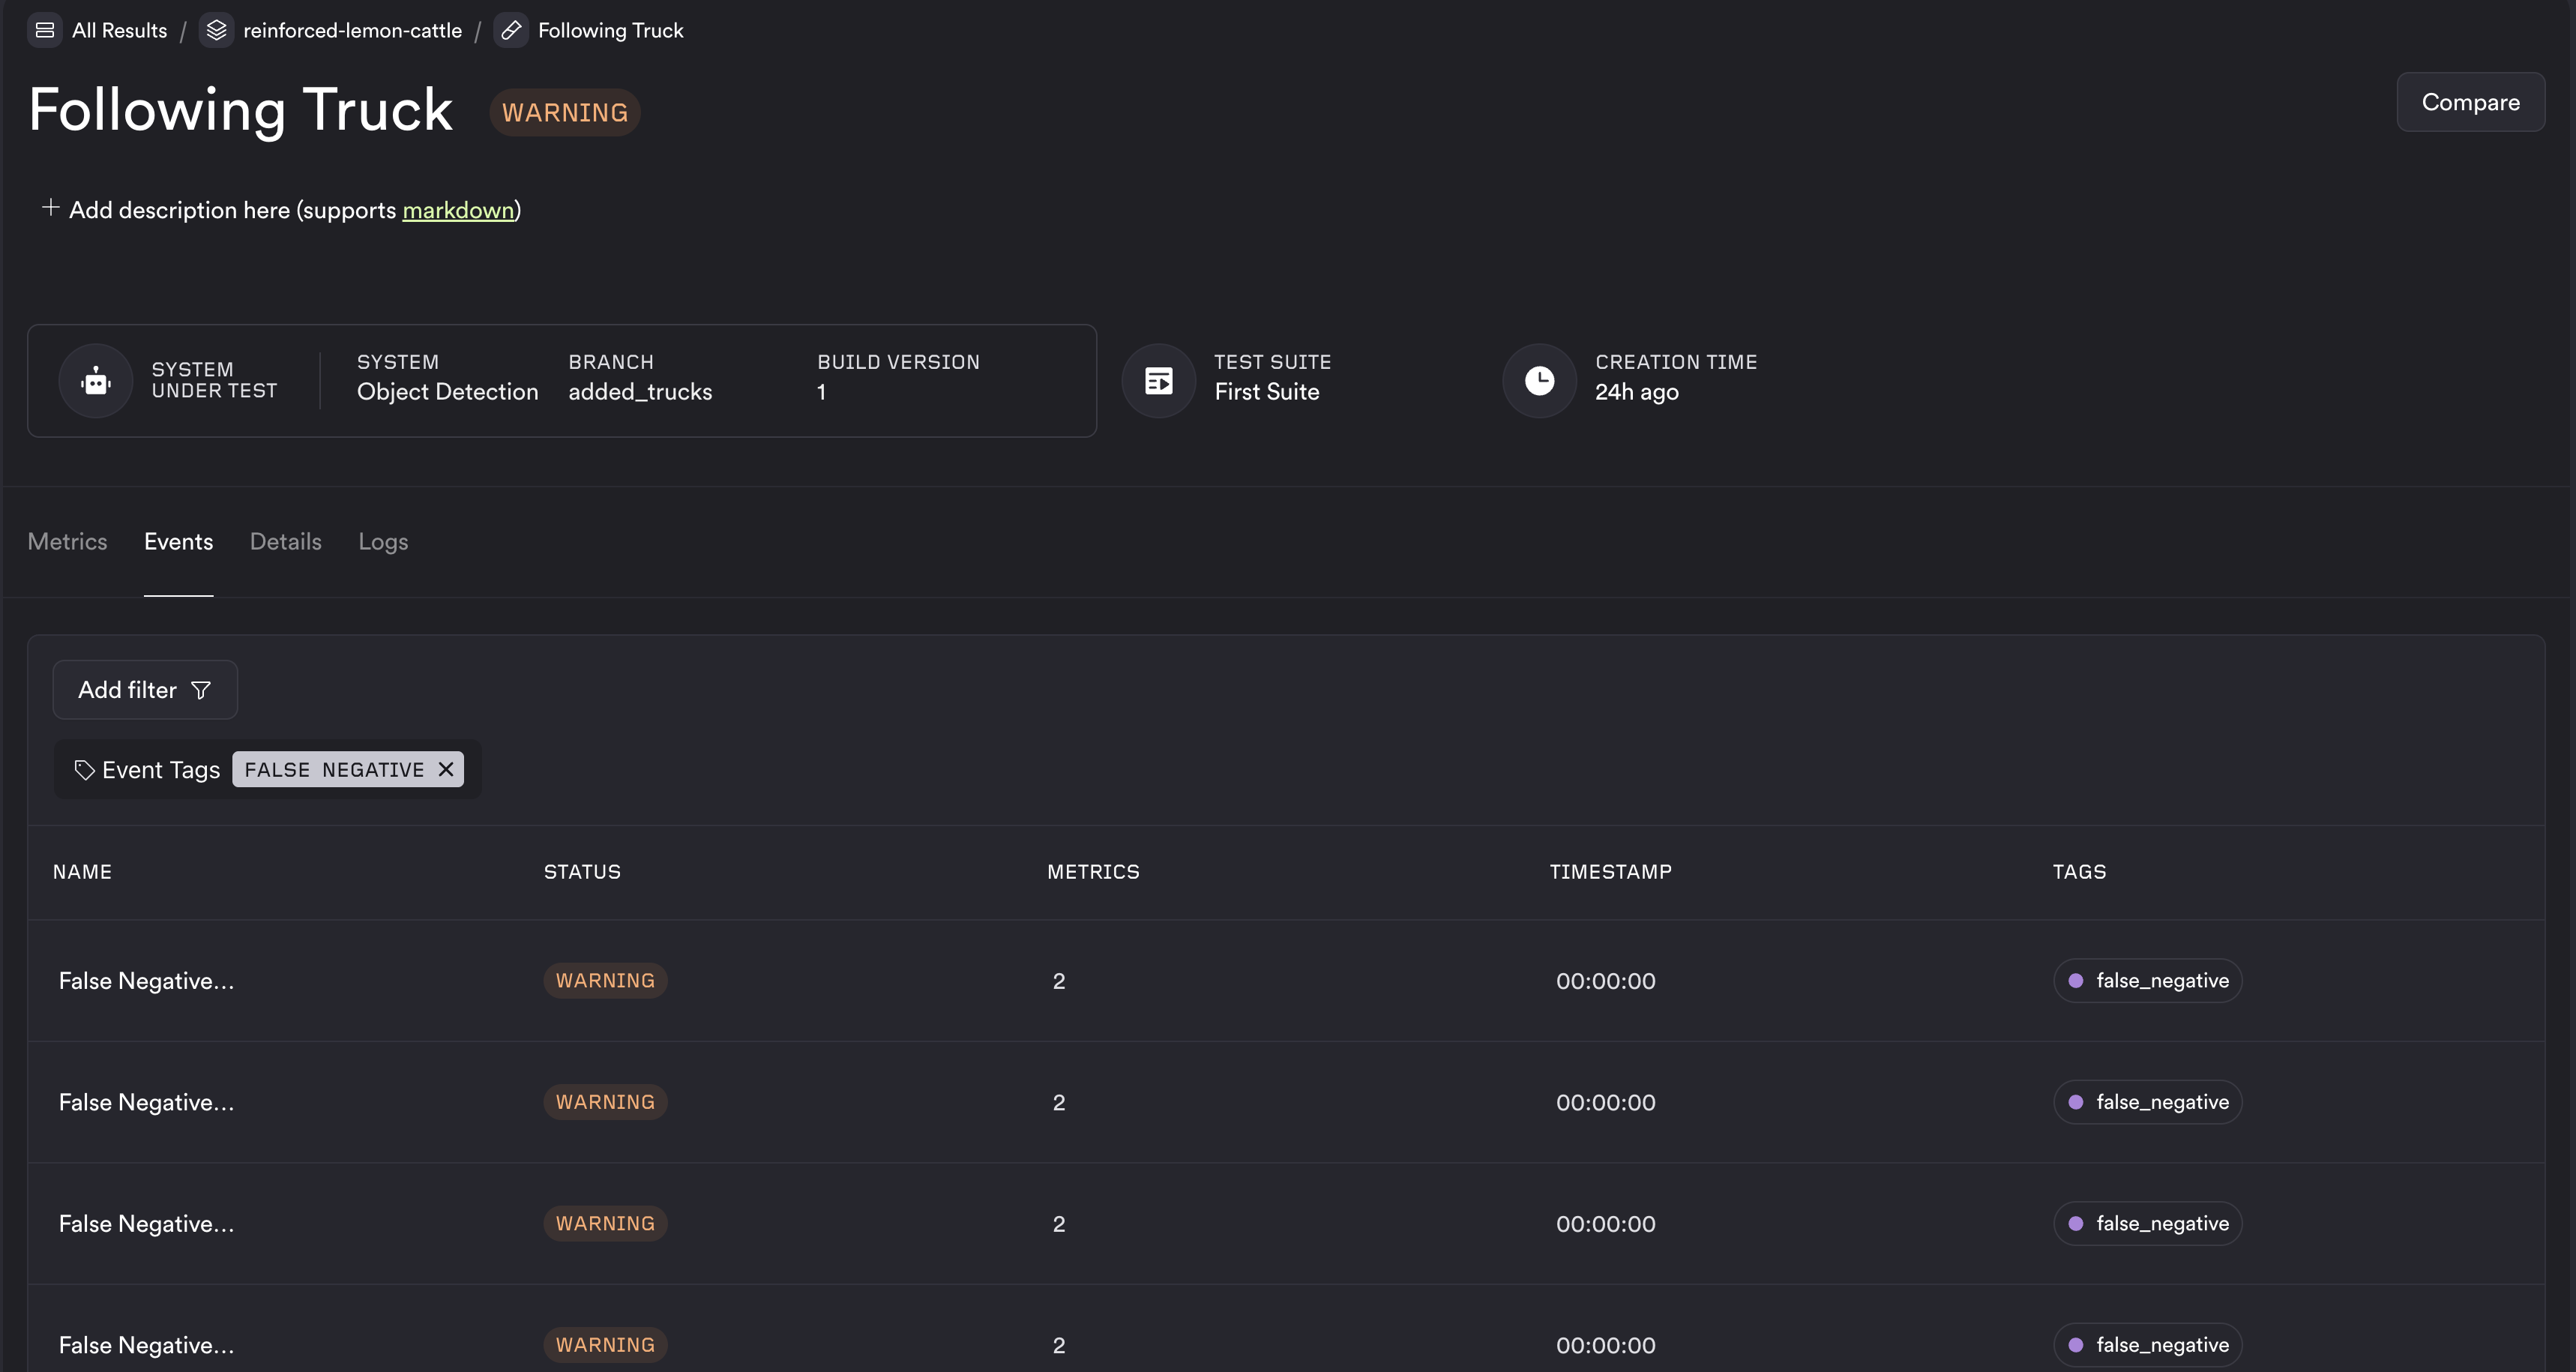
Visualizing these events can provide insight into how the model may be underperforming. In this case, you can see the unmatched ground truth was the truck, and the right image showing all detections not including the truck.
Step 6 - Changing model
When tuning models, there are many knobs that can be moved to change the performance. In our simple case, we are going to change the threshold, and add Truck as a query in our general-purpose model in the experience stage, build the Docker container with the new setup, push to ECR, connect it to ReSim using the CLI, and run the test.
A/B compare
Now that the new model is created, we can re-run a test with the new version. Once done, we can directly compare the runs between the two versions to get a side-by-side comparison of results on both the batch and test levels.
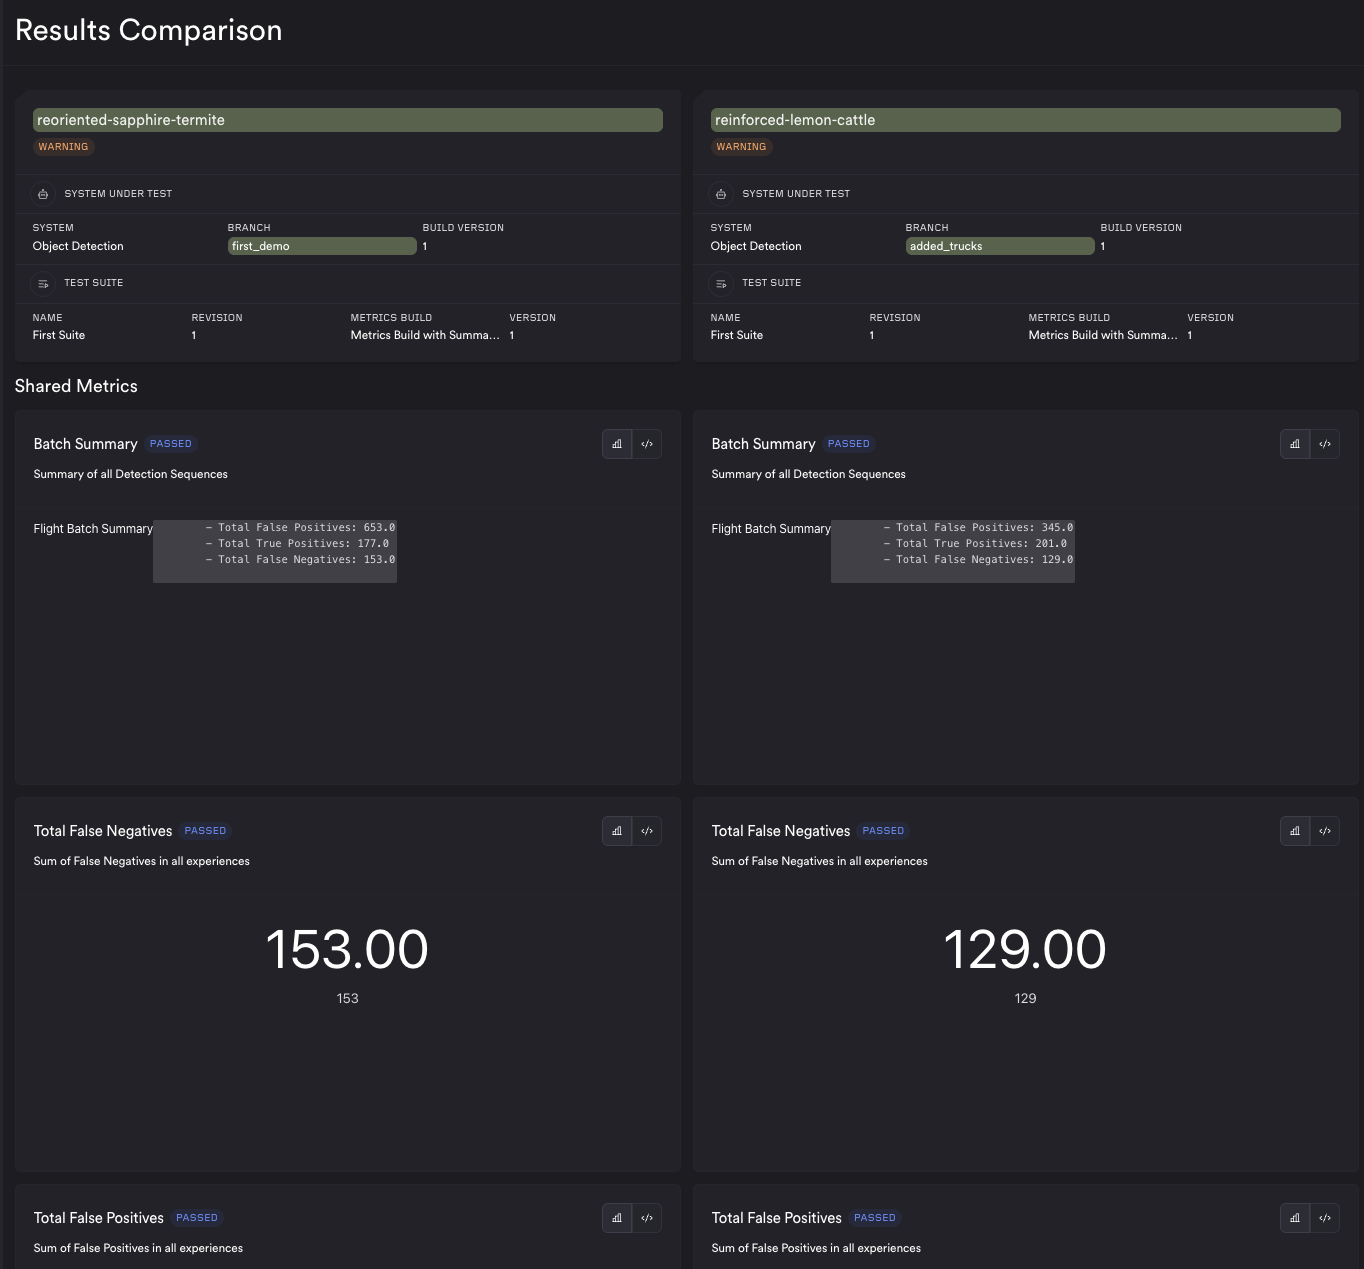
From the comparison view, we can see improved performance of the model because of the changes. Hence we can conclude that there were improvements. On a similar vein, we could also detect regressions.
Conclusion
In this doc, we went over how we could use ReSim to analyze a model, perform tweaks and check for improvements/regressions as compared to the original version. Our customers use it as part of their Continuous Integration Nightly runs to ensure they flag regressions, as well as extensively in their development to tune and test their models at scale.